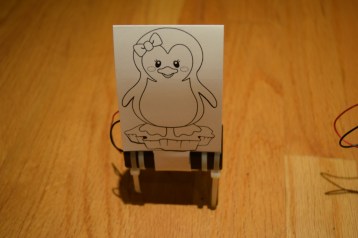
Here’s directions on how to build a simple vibration robot using a battery holder, a vibration motor, and cable ties. I designed this to be a “maker” craft at my daughter’s penguin-themed birthday party, but I’m sure these can easily be adapted to whatever party theme you need. Each of the party attendees helped with the final assembly and decorated these robots as penguins so they could participate in the “Penguin Robot Dance Party.” My robot is the “Tux” robot (a.k.a. as the Linux mascot).
Materials and tools
 |
Vibrating motor This is a DC motor with an offset weight stuck on the end. They are used in massagers, game controllers, and other items that you want to vibrate. |
 |
AA Battery Holder with Switch This battery holder has a switch, which is a must-have feature when you want to stop your robot. |
 |
Double-stick foam tape You’ll need about 1 inch per robot. |
 |
Cable ties
|
 |
AA Battery I used only 1 battery per robot, but you can use 2 per robot if you want your robot to move faster (see the discussion in the directions below). |
 |
Soldering iron Obviously, only buy this if you don’t have one already. |
 |
Solder You’ll need about an inch of this per robot. |
Total cost for each robot was about $2.50 per robot (primarily for the motor, battery pack, and batteries). The best place to get the vibration motor and battery pack is from Ebay. The other items are all on Amazon. Click the links in the table above to see the prices.
Directions:
Get your materials together.
Solder the leads of the battery holder to the motor. I chose to use only one AA battery per robot. It works fine with two batteries, but the vibration makes a louder sound, and it was not conducive to a festive party atmosphere. Shorting out one side of the battery holder with a wire that I soldered allowed me to use just one battery and reduce the noise a bit.
Use the double-stick foam tape to attach the motor to the battery pack. Attach the four cable ties so the tips point down and they look like legs.
Here is the file with the penguin robot that we let the kids color to decorate their penguins. After they colored them in, just tape it on. Make sure the paper is not bumping against the motor to reduce the noise.
You may need to fine-tune the position and angle of the cable ties. Bending the cable tie of one leg toward the center of gravity tends to make the robot move more toward that leg. But sometime it doesn’t, so just try a bunch of things and eventually it will work.
One interesting thing we discovered is that these robots can also be setup to follow along a wooden Thomas the tank engine train track. You might need to tape the train tracks together with a piece of Scotch tape so there is no gaps, and adjust the width of the cable tie legs a bit. You can either setup two parallel tracks and run “Penguin Races” or setup a loop, like shown below in the video.


