For our drone flying project, we needed a way for our computer to detect the location of our mini-drone through the use of a webcam mounted above the flying area. We are not at all familiar with computer vision algorithms, but we do know how to call functions from a Python library! We made use of OpenCV (Open Source Computer Vision), which is available for Python and C++.
For our Python environment, we chose Python(x,y). Python(x,y) is a version of Python developed specifically for scientific calculations and visualizations. If you are a fan of Matlab, then you will feel right at home with Python(x,y).
This is what you need to do to set up a Python(x,y) development environment with OpenCV.
-
- Install the latest revision of the python(x,y) package. This includes Spyder (Scientific PYthon Development EnviRonment). Download Python(x,y) here.
- For the Python(x,y) install, choose Custom install and select the Python ➞ PySerial 2.7-1 component. PySerial is needed to communicate with an Arduino.

- Optional: We also like to add the Other ➞ WinMerge component when installing Python(x,y), but it is not required.
- You will also need to install the opencv2 package. Download opencv2 here.
- Unzip the opencv2 package and copy
opencv\build\python\2.7\x86\cv2.pyd to <python dir>\Lib\site-packages\ where the default Windows location for <python dir> is C:\Python27
Note: If your computer supports it, copy opencv\build\python\2.7\x64\cv2.pyd instead of x86. I decided which to run by first trying the x64 copy, but the x64 version did not work for me when run. So I copied the x86 version instead. See below for how to check if OpenCV is loading properly.
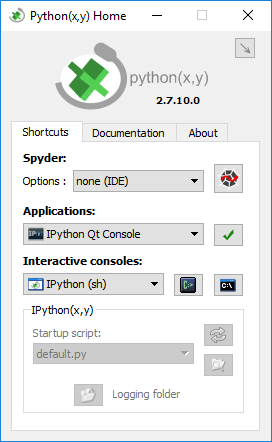
Now it’s time to check if your development environment is working. Start Python(x,y) and you will see this window:

Click on the small blue and red icon ![]() that looks like a spider web to start the Spyder IDE. Here is what the Spyder IDE looks like:
that looks like a spider web to start the Spyder IDE. Here is what the Spyder IDE looks like:
The bottom right portion of the IDE shows the IPython console. You can run scripts or call Python commands directly in the IPython console.
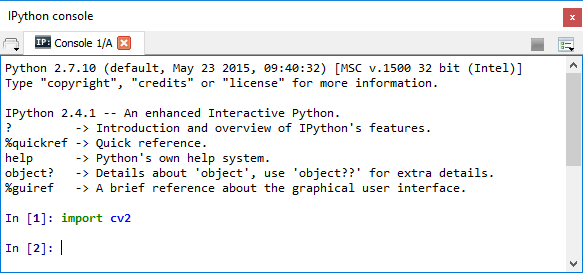
In the IPython console, type import cv2 and hit enter.
If there is a problem, then you will receive an error, likely an error about “No module named cv2”. If that happens, then check that you copied the OpenCV files to the correct location as described in Step 3 above.
If everything is working, then the console will accept your command and show a prompt for your next command like this:
Hooray, you have successfully set up Python(x,y) and OpenCV! Nothing to it, right? Now let’s see what we can do with OpenCV. Take a look at our post on blob detection with OpenCV.


Hi HJ, the UnicodeDecodeError message might be related to the version of Python that you’re running. Our project is from three years ago and using Python version 2.7. These instructions might not work for the latest version of OpenCV.
Thank you for reply!!
I try to make same version and successful!!
That’s great, HJ! I’m glad that you got it working!
Hi! Thanks your post.
I have problem..
When I typing “import cv2” This error message always coming..
Can you help me Please!
Traceback (most recent call last):
File “C:\Python27\lib\site-packages\IPython\core\interactiveshell.py”, line 2894, in run_code
self.showtraceback()
File “C:\Python27\lib\site-packages\IPython\core\interactiveshell.py”, line 1756, in showtraceback
value, tb, tb_offset=tb_offset)
File “C:\Python27\lib\site-packages\IPython\core\ultratb.py”, line 1190, in structured_traceback
self, etype, value, tb, tb_offset, context)
File “C:\Python27\lib\site-packages\IPython\core\ultratb.py”, line 1107, in structured_traceback
self, etype, value, elist, tb_offset, context
File “C:\Python27\lib\site-packages\IPython\core\ultratb.py”, line 503, in structured_traceback
lines = ”.join(self._format_exception_only(etype, value))
File “C:\Python27\lib\site-packages\IPython\core\ultratb.py”, line 617, in _format_exception_only
Colors.Normal, s))
UnicodeDecodeError: ‘ascii’ codec can’t decode byte 0xc0 in position 19: ordinal not in range(128)